29 June 2013

The Home Depot Garden Club


It's summer time and I've been working on a lot of outside projects.  Planting trees, berry bushes, and flowers.  To see more click here.  I know you've been working on your gardens and landscapes too.  Don't you wish that sometimes you had a little bit of help.  Maybe someone to turn to for project ideas, how to videos, a regional to-do-list and expert advice?  Well, now you do and it's FREE to join!


When you join the club you'll get a $5 off $50 purchase coupon and $300 in email savings annually.

Here's an idea for a candle lit planter, from The Home Depot! They give you great outdoor ideas and show you how to make them.


I think I know what I want to try with my coupon.  What are you going to do with yours?

27 June 2013

Co-hosting TGIF Link Party No. 2

Welcome to Living Better Together and the TGIF Link Party!


I'm your host, Rebecca from Living Better Together, in case we haven't met yet! 

I'm so excited to introduce my two fabulous co-hosts for this week:


Callie from Callie's Crafts


and Aniko from Place of my Taste


____________________________________________________________________
Features:

Most Viewed 

FREE Porch Quick Fix by Bella Caiden. Shannon delivers a true "less is more" post, removing the railings gave her home a whole new look and I love it!

Other Favorites:


Strawberry Poppyseed Chicken Salad by Place of my Taste. Aniko will make your taste buds dance with this delicious dish inspired from Panera Bread! Oh what I would give to have this and some Panera lemonade for dinner tonight!


Blog Planner by TitiCrafty. Cami puts us all to shame with this super organized planner, I only wish I could be this organized. I guess when you blog in two different languages you probably have to be... again, she puts us or at least me to shame.


Homemade Hamburger Buns by Your Homebased Mom. Leigh Anne made these amazing buns and they look so good I think I can smell them! I never would have thought to make these from scratch, but they're on my to-make list now!

Grab a feature button!

 photo TGIF_featured_zpsbe37ee90.png

____________________________________________________________________

Link up your recipes, projects, tips and tricks, etc. Each week I'll be featuring some great posts from the previous week, so be sure to check back to see if you were featured and to link up again! If you are interested in co-hosting, email me at fickrj5@gmail.com. Share this party with your friends, and don't forget to make some new ones while you're here! We all love making new friends, don't we?

Rules:


1. Follow your host and co-hosts via GFC, Facebook, Blog Lovin, Twitter or Google+.


2. Grab the party button and add it to your party list or post.


 photo TGIF_zps40a588c0.png


3. No Giveaways or Etsy Shops.


4. Please link to a specific post, not your homepage.

5. Get inspired! Visit other links! It is a party after all, no dining and dashing!


____________________________________________________________________


Thank God it's Friday! Get ready to party!


I'll be pinning all of your links to my TGIF Link Party Board on Pinterest to share with my followers!


24 June 2013

Antique Vanity with Mirror More Yard Sale Finds


I hate to show you the junk (future projects) and toys in my garage but you have to see what I found at a garage sale.  Isn't it beautiful?  The lady let it go for just $45.00!  I'm not sure how I'm going to refinish this vanity!  I just knew that I had to have it!

Here are a few vanity makeovers that I've found.  Click the picture to visit the source!


So what do you think?  Do you have any vanity that you have refinished?  I'd love to see it, leave a link in the comments.

Sharing At:

21 June 2013

Table and Chairs a Great Yard Sale Find

I've made it to a few yard sales so far this summer.  I am so excited I have to share with you what I found. 


What, you can't see it? Look behind the bush.


There it is.  Isn't it precious?  This is a really odd spot to landscape in the front flowerbed.  Don't you think that it's the perfect place for a small table and chairs? The kids already like to play house in this spot.  This will be perfect for them, too.  I only paid $15 for this set.  The lady who sold it played on it as a kid.  She said that it was at least 40 years old.  It's made of metal and wood.  It looks lovely in white but I want to give it a little more character.  I see a makeover in the future!


This little hydrangea is getting bigger every year,  I can't wait to see it fully grown.  I hope this inspires you to visit a few yard sales this weekend! Be sure to follow me so you can see what else I found.

Sharing At:

 photo TGIF_zps40a588c0.pngFurniture Feature Fridays

17 June 2013

Stenciled Lazy Susan


I had a reader recently comment that "Sometimes people show room makeovers and before and after pics and make it seem like it was a quick/no big deal kind of thing."  I find that to be so true.  This post will not just be a quick before and after!  You are going to see every step and every mess-up in-between.  If at first you don't succeed, try, try, again.


martha stewart stencil and minwax stain on lazy suzan

12 June 2013

Guest Blogger : Parrish from Life With The Crust Cut Off


I'm happy have Parrish here today to share with us a tasty recipe.  When your done here hop on over to her blog and check it out.  Be sure to follow her too.


Life With The Crust Cut Off
 
Hi!! I'm Parrish, I am married to the milkman and I'm mommy to one ridiculously rambunctious toddler, Dean.  I like creating and sharing recipes and I love sharing "war" stories about parenting.  I strive to create a site free of the "mommy judgement" where all moms can go and feel comfortable about how they decide to raise their kids. Thanks so much to Callie for letting me share my Smores Bars with you!!

I must confess I hate smores, the flavor combo is delicious but let’s face it the construction of smores is just setting up you for a sticky disaster. Your first bite squishes the molten marshmallow and chocolate out the sides, all over your hands, the floor and what not. I get it….smores are fun, messy, outside food but what is the point when after the first bite all you are left with is 2 empty graham crackers and sticky shoes?

This recipe has been all over the internet (and by all over the internet yes I mean Pinterest) and I decided to give it a shot for this National Smores day and boy was it delicious.


This was super simple to make and a million times easier to eat than traditional smores, everyone loved them, and while I messed up and did not read the directions properly and let it cool, we ate it piping hot from the oven and it was melty and fabulous and even after I let it cool like I was supposed to it was still amazingly delicious!

Word of advice this recipe calls for Giant Hershey bars from the candy aisle, not king sized from the checkout. You can use either but the Giant ones fit perfectly. I will be making this recipe again and again and my mind is already spinning with ideas on swapping out the Hershey bars for peanut butter cups or peppermint patties YUM!!!

So grab your kids and some graham crackers and have a Happy Smores Day!!!!!!

Smores Bars (from Lovin in the Oven)

Ingredients:
  • 1/2 cup butter, room temperature
  • 1/4 cup brown sugar
  • 1/2 cup sugar
  • 1 large egg
  • 1 tsp vanilla extract
  • 1 1/3 cups all purpose flour
  • 3/4 cup graham cracker crumbs
  • 1 tsp baking powder
  • 1/4 tsp salt
  • 2 king-sized milk chocolate bars (e.g. Hershey’s)
  • 1 1/2 cups marshmallow creme/fluff (not melted marshmallows)
Directions:

Preheat oven to 350°F. Grease an 8-inch square baking pan.

In a large bowl, cream together butter and sugar until light. Beat in egg and vanilla. In a small bowl, whisk together flour, graham cracker crumbs, baking powder and salt. Add to butter mixture and mix at a low speed until combined.

Divide dough in half and press half of dough into an even layer on the bottom of the prepared pan. Place chocolate bars over dough. 2 giant-sized Hershey’s bars should fit perfectly side by side, but break the chocolate (if necessary) to get it to fit in a single layer no more than 1/4 inch thick. Spread chocolate with marshmallow creme or fluff. Place remaining dough in a single layer on top of the fluff (most easily achieved by flattening the dough into small shingles and laying them together).

Bake for 30 to 35 minutes, until lightly browned. Cool completely before cutting into bars.

11 June 2013

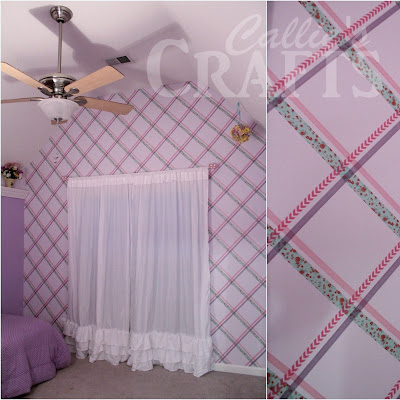
Washi Tape Wall Pattern

 
Washi Tape wall pattern that looks like wallpaper
I completed this wall pattern using washi tape, a few weeks ago, for One Crafty Contest.  I am just now getting around to posting about it!  I was so excited to take on this challenge because I have never used washi tape before.  I wanted to do something grand and original.  That's when I had the idea for this wall.  The competition challenged me to think about washi tape in a whole new way.  It took 16 rolls of washi in four different patterns to complete this design.

07 June 2013

Guest Blogger: Dana from This Silly Girl's Life

Today, I'm excited to introduce you to Dana from This Silly Girl's Life. She is a former professional Chef turned blogger, a newly wed, a homemaker, a daughter, lover of a good book, Mama to 4 beautiful fur babies and a cookin’ fool!

Hi everyone, I'm so excited to be guest posting with Callie today! I hope you like this recipe I brought you! I made these healthy fish tacos with cumin spiced yogurt sauce and they were a great alternative to taco night! A nice light dinner or lunch on a hot summer day, perfection!

fish tacos

05 June 2013

4th of July Glitter Jeans and T-Shirt

  I'm sad to announce that I didn't make it into the top 5 at one crafty contest.  
To see who did click here.
 It was so much fun being a part of One Crafty Contest.  It challenged me to complete my paint project on time and work with products I have never used before like washi tape.  The challenge for round 5 was glitter I created this 4th of July outfit for my daughter.  I think I may make coordinating outfits for my other kids.

DIY 4th of July Glitter T shirt and Jeans

03 June 2013

Mod Podge & Paper Butterflies Lamp Shade


I can mark another project off the list for my daughter's room.  Only 3 more until it's complete, maybe.  I found this great little lamp for my daughter's room at Dollar General!  I saw a blank slate and knew I could find something crafty to do to it.  A stencil?  Some ruffles?  How about flowers?  


How about Mod Podge?


29 May 2013

Our yard this summer, so far and One Crafty Contest.


I made it into the top 10 at One Crafty Contest!

Entry Round : Top 20
Round 1 Paint : Top 15
Round 2 Washi Tape : Top 10


Round 3 is Glitter!  Voting begins Monday 6/3 and ends Tuesday 6/4 at noon est.

*Update* I did not make the top 5 :(  Click here to see who did.

Glitter Round 3

25 May 2013

Spray Painted Plant Stand

After a long winter my back patio looks so blah.  I've done some work in the front yard but the back yard is another story.  Even the previous owners thought the plant stand was in an awful condition, they left it here when they moved!

Rustoleum lagoon spray painted plant stand

22 May 2013

Stenciled Dresser for One Crafty Contest

My dresser made it into the top 15 at One Crafty Contest!  If your not following along, at One Artsy Mama, you should be.  Readers get to vote for their favorites!

When I found out paint was the challenge I had a flash flood of ideas.  Paint sounds so easy but the options are endless and it made this a real challenge.  I finally pulled my thoughts together and I thought of this dresser I bought at a yard sale this spring.  Finding time to complete this project, in just 5 days, proved to be an even bigger challenge.    

Wednesday: 

I had so many ideas.  I had to weigh all the options and go with the one that would make the biggest impact.  I wanted to use different techniques and types of paint.  I planned to put this in my daughter's room and use the paint left over from her walls.


Thursday:

This dresser has been painted so many times before.  It even had that funky smell, yeah you know the smell.  I just couldn't put another coat of paint over it.  I had to strip off all the old paint and do this right.  I used my palm sander with 80grit paper and then 150grit paper.


Friday: 
I finished sanding the edges of the drawers, by hand.  I was even able to get all the drawers painted.  Then, I had to stop the project for my son's ball game.


The first coat of primer.


 The first coat of paint.


Saturday:
I had to take time off to have my son's birthday party!  I found time, later that night when my husband got home, to paint the body of the dresser white and the sides of the drawers lavender.  I had the hardest time deciding what stencil to use.  It was getting late and I was too tired to do anymore work. 

Sunday:
It was to humid to paint outside. So, I had to take the project inside.  I started stenciling the sides and the top.  Stenciling is really time consuming but well worth the effort.  I learned from experience that you need to use a repositionable spray adhesive to avoid bleeding (sounds painful, right?).  


I still didn't know how I was going to use the paint to transform this dresser.  I wanted to stencil but I had a hard time choosing the pattern.  I went with the Martha Stewart Arabesque Craft Stencil for the top and sides.


 Stenciling really took a long time.  I used a foam roller to apply a very pale lavender paint.  I had to stop my project at 3:00 because my husband made plans with a friend to do a cook out (before I entered the contest).


Right about this point I decided to paint the sides and the face the same color as the stencil.
 

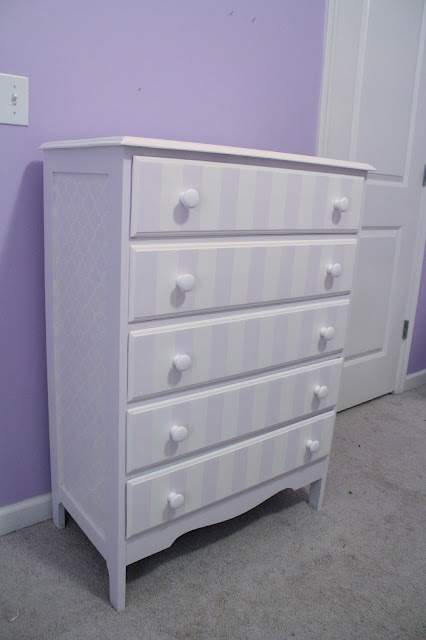
I started working on it again at about 7:00 pm.  I only had four hours left to submit the project. Yikes!!!  I added the knobs but felt that the front was to plain all white.  I felt like Pooh Bear, think, think, think.  What could I do to accent the drawers but not take away from the stencil?  Then it hit me, stripes!  The tape was just the right width for perfect stripes.  I covered the whole front and then removed every other piece.  Painting the exposed area lavender.


I removed all the tape and put the knobs on the drawers.  Then I added shelf lining to the inside of the drawers.  It was 10:00!  I finished on time.  Before I could submit my project I had to take pictures, create a collage, and do a write up.  With only 10 minutes to spare I completed the challenge.

Below is my submission.
 

When I found out paint was the challenge I had a flash flood of ideas.  Paint sounds so easy but the options are endless and it made this a real challenge.  I finally pulled my thoughts together and I thought of this dresser I bought at a yard sale this spring.  This dresser has been painted so many times before.  It even had that funky smell, yeah you know the smell.  I just couldn't put another coat of paint over it.  I had to strip off all the old paint and do this right.  I painted the dresser, high gloss, white and stenciled the top and sides with a very faint, egg shell, lavender.  I painted the front of the drawers with a stripe pattern.  I used a slightly darker lavender to highlight the side of the drawers.  The dresser features two patterns, two sheens, and three colors, making it a playful yet subtle work of art.  Finally, for that finishing touch, I added white porcelain knobs.

Here are a few more pictures of the finished dresser.


 Thanks for reading and thanks for your support in the contest!  I can't wait to show you what I have in store for next week.


Sharing At:

The Life of Jennifer DawnButton pic 9PhotobucketGrab button for This Silly Girl's LifeHigh Heels and GrillsWhip It Up Wednesday Handmade Linky PartyBLOG TITLECreativeShare<br><br><br><b>Join us every Friday...</b> photo grabbutton2_zps6720f346.pngRooted In ThymeFunky_Junk's_Party_Junk_link_partyOr so she saysToo Much Time On My HandsDIY blog Classy ClutterTitiCrafty by CamilaToday's Creative BlogSomeday I'll Learnhttp://atozebracelebrations.com/assets/AtoZebra_LinkParty_Button_180x1806.jpgBrag About It | Linky Party | No. 1Memories by the MileOne More Time Events52 MantelsThe Gunny SackSuburbsmamaPhotobucketsaving4sixKatie's Nesting SpotEasy Living MomHookingupwithHoHPhotobucketInspire Us Thursday at Organized 31