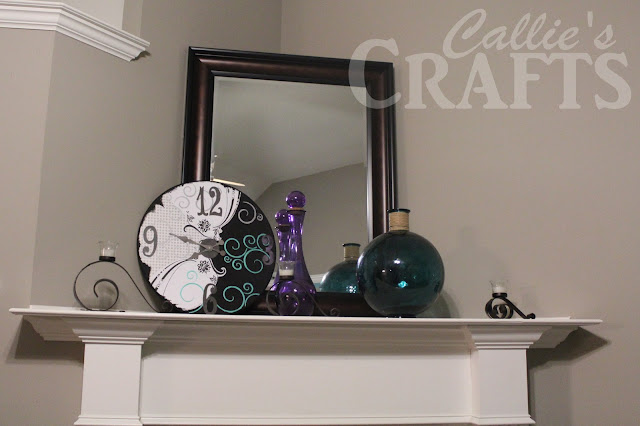
For Christmas my husband bought me this gorgeous mirror. A few weeks later I found these awesome glass bottles. I love that they are so big. The mantel still needed something more. Decorating a corner mantle is tricky especially when the ceiling is high. Everything on the mantle has to be over sized to fit the space. I had the idea to put a clock on the mantle, it too would have to be big. A big clock means big money right? Then here comes the thought.....you can make a clock.
I'm not a carpenter but I play one on my blog!
The best way to cut a circle from plywood is with a jig saw. We have almost every tool and saw there is, but not a jig saw. The whole point in making the clock was to save money, and I didn't want to buy a new tool. I looked at the hardware stores for a wooden circle that was already cut. Sometimes they sell particle board table tops to make end tables. All I could find were the really nice wood table tops but they were
too small 17," and too big 36", and way too expensive. The large one was $40.00.
too small 17," and too big 36", and way too expensive. The large one was $40.00.
I was complaining talking to my friend and she says, "I have one of those and I don't use it any more!"
So thanks to a great friend, I got exactly what I was looking for, for free!
So thanks to a great friend, I got exactly what I was looking for, for free!
I wanted the edges on the clock routered. My husband has been working a lot and hasn't been around to help with any of my projects, and I don't have much patience! When I get an idea, I want it done, now! So I got to work trying to figure it out. The power button was easy, but the depth adjustment, not so much. Thankfully the router bit I wanted to use was already on. It took a little tinkering, but I got it figured out. I practiced on some extra wood and was able to achieve the look I wanted. I routered both sides, and was able to get the bullnose edge I was looking for. Not so scary after all!
Next, I took this project inside and painted the edges and half of the circle with black acrylic paint. I cut around the design on the scrapbook paper and used Mod Podge to glue it to the clock. (I used 3 pieces of coordinating paper.) I used metallic teal and metallic silver paint to stencil the swirl design. This stencil came from Micheal's.
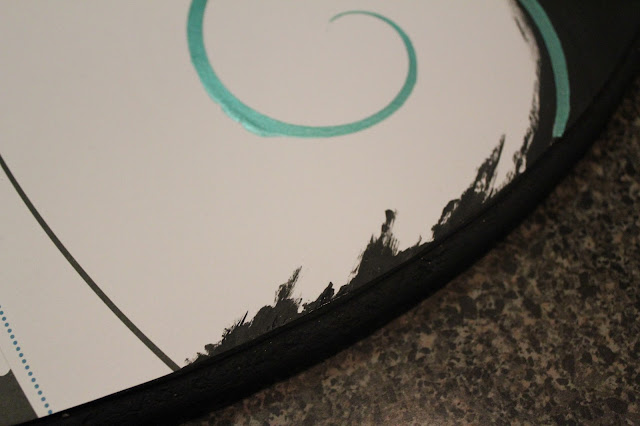
I used a paint brush to create a distressed effect on the edges.
I cut out numbers using my Cricut with the Storybook Cartridge.
I purchased the clock kit at Micheal's for about $5.00.
The large clock hands were sold separately, and luckily on sale for just 79 cents.
Well, here it is! I love it...it looks great on the mantle and it's just my style.


![pinterestparty_thumb[1] pinterestparty thumb1 thumb1 Pinterest Power Party {7}](http://www.thetaylor-house.com/wp-content/uploads/2013/01/pinterestparty_thumb1_thumb1.png)


Very cute! And I love when you can make something that is perfect for practically nothing. Thanks for sharing
ReplyDeleteMe too. Thanks for visiting.
DeleteI think that Clock is incredible. That is something that is truly creative and original. You don't normally see things anymore that are original. Thanks for the wonderful idea.
ReplyDeleteThat is so sweet. Thanks for stopping by.
DeleteVery cool! Can't believe you tackled the router by yourself without ever doing it before, smart daughter!!!
ReplyDeleteI've seen it done, does that count?
DeleteWow, you did a great job. If I saw that clock in a store I'd totally buy it!!
ReplyDeleteI definitely would make another one for sale.
DeleteThat is beautiful. I would love to have one for my hutch. Your newest follower. Rhonda
ReplyDeleteThanks for following! I am considering making a few more and adding them to my etsy shop. If your interested in a custome clock let me know.
DeleteThanks, I'll be there.
ReplyDeleteYou did a fabulous job! I love the colors and design. Stopping by from What I learned Wed. :)
ReplyDeleteKathy
lifeonlakeshoredrive.com
Thanks for visiting and leaving a comment. I love comments!
DeleteThats really nice, great job! Please link it up with me at Wow Us Wednesday ok? http://www.familyhomeandlife.com/2013/02/wow-us-wednesday_20.html
ReplyDeleteSure. Thanks for visiting.
DeleteThis is awesome! Love the stenciling and all of the details. Girl...you got skills!
ReplyDeleteThank you. I love it too.
DeleteI love it! The clock adds a lot to your mantel.
ReplyDeleteThanks for visiting! It really became the focal piece.
DeleteWhat!! You made that?? It looks fantastic!! The teal swirls are my favorite.
ReplyDeleteThanks, I really enjoyed creating it. I chose teal because the gallery wall in the family room is teal.
DeleteWhat a fun project! I am super impressed that you used the router by yourself! And it's great that you had a friend with the perfect sized circle to use. I absolutely love how your clock turned out. It's awesome that you were able to make a customized clock for your mantle, you'll feel proud of yourself everytime you look at it. Thank you for linking it up to A Crafty Soiree, I've featured yours in the newest one. Please come by to see your feature and share more of your creativity with us.
ReplyDeleteI'm thrilled that you like it so much. It really was a fun project. I like that by making it I got exactly what I wanted. Thanks for the feature too.
DeleteGreat job! It looks really nice on your mantel! Thanks for sharing at The Gunny Sack!
ReplyDeleteThank you. I'll be there next week.
Deletewow, so cool, Callie! my dad made a clock growing up with stained glass - beautiful but not really my style. I could get with this! :) thanks for linking up!
ReplyDeleteThanks for stopping by.
DeleteYup! I know what you mean about the already made clocks, they are boring or not it. I like what you did. Pinned your post today. Maybe one of these days I will try it.
ReplyDeleteI had an idea and I couldn't find it in a store. Putting the clock together is the easy part. Knowing when the design is finished is much harder.
DeleteThis is the husband that never helps with any of the projects. I am amazed at all the creative ideas my wife has. Everyday it is something new she wants to do. The truth is, I would be like most husbands and try to find a reason to put a stop to the ideas, but none of them are ever bad. My wife is extremely talented someone that is full of creativity which is a true gift. She loves to see what new things she can create and finish( that is why she never waits for me to get home to help;) ) I think my wife is a super star and anyone who follows her will see some amazing things and new fresh ideas. Great job as usual sweetie. I love you.
ReplyDeleteI love this Guy!
DeleteI like the clock design. A LOT! Thanks for sharing at What to do Weekends. Love to have you link up. It helps make the party great! Linda
ReplyDeleteThis clock looks so gorgeous!! You did a great job. Pinning this for sure. Thanks for linking up at Romance on a dime!!
ReplyDeleteThank you for the comment love.
DeleteFeaturing you tomorrow!
ReplyDeleteI'm glad you liked my clock. I'm so excited about the feature. I be there tomorrow for another great party.
DeleteThe clock has a great graphic look - well done!
ReplyDeleteThank you.
DeleteI love how this turned out! And the colors are awesome. I'm featuring this tonight at my link party and am now following you on Facebook!
ReplyDeleteThank you for the feature and following me on facebook. I'll be there to link up at your party.
DeleteGreat job! Very cute and very creative! Good job using the router-I'm scared to try that!
ReplyDeleteThanks, It wasn't too bad. I just tried it out on some extra wood first.
DeleteWow, what a inspiration....you've got my mind spinning! Beautiful job! Love the colors, found you at my daughters site, Trendy Treehouse, would love to have you stop in at pinecreekstyle.blogspot.com......NeeCee
ReplyDeleteThanks! I will stop by.
DeleteThis is so cute! Thanks for joining my Link Up! :)
ReplyDeleteYou're welcome.
DeleteCallie,
ReplyDeleteThank you so much for bring this beautiful clock to my party. I pinned it! Can't wait to see what you bring next Tuesday.
xoxo
Wanda Ann @ Memories by the Mile
Thanks, I'll be there.
DeleteFabulous clock!! Nicely done! ;)
ReplyDeleteBrenda @ChattingOverChocolate.blogspot.com
Thank you. It was a lot of fun to do.
DeleteThis turned out great. On my list of things to do. I'd love for you to come link up to our party where we can show off all of our old or new projects! :)
ReplyDeletehttp://www.cutesycrafts.com/2013/03/an-oldie-but-goodie-11.html - Jessica
Thank you Jessica. I will.
DeleteThis. is. GORGEOUS! I love everything about it!! So glad you entered One Crafty Contest!!
ReplyDeleteThank you, Amy. I'm glad you like it.
DeleteCallie, did you see you made the Top 20? I need you to check your email and verify that you're competing before midnight!
ReplyDelete