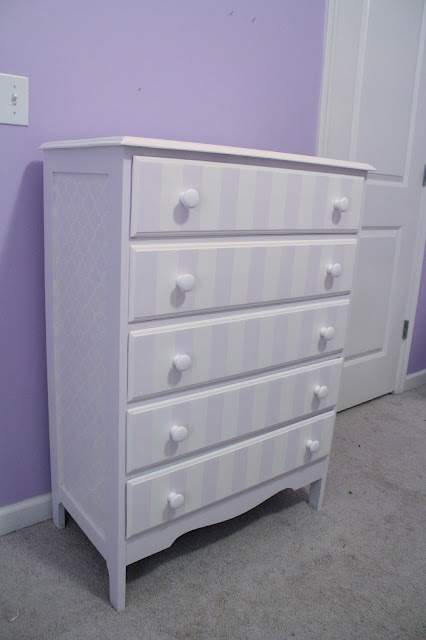
My dresser made it into the top 15 at One Crafty Contest! If your not following along, at One Artsy Mama, you should be. Readers get to vote for their favorites!
When I found out paint was the challenge I had a flash flood of ideas. Paint sounds so easy but the options are endless and it made this a real challenge. I finally pulled my thoughts together and I thought of this dresser I bought at a yard sale this spring. Finding time to complete this project, in just 5 days, proved to be an even bigger challenge.
Wednesday:
I had so many ideas. I had to weigh all the options and go with the one that would make the biggest impact. I wanted to use different techniques and types of paint. I planned to put this in my daughter's room and use the paint left over from her walls.
Thursday:
This dresser has been painted so many times before. It even had that funky smell, yeah you know the smell. I just couldn't put another coat of paint over it. I had to strip off all the old paint and do this right. I used my palm sander with 80grit paper and then 150grit paper.
Friday:
I finished sanding the edges of the drawers, by hand. I was even able to get all the drawers painted. Then, I had to stop the project for my son's ball game.
The first coat of primer.
The first coat of paint.
Saturday:
I had to take time off to have my son's birthday party! I found time, later that night when my husband got home, to paint the body of the dresser white and the sides of the drawers lavender. I had the hardest time deciding what stencil to use. It was getting late and I was too tired to do anymore work.
Sunday:
It was to humid to paint outside. So, I had to take the project inside. I started stenciling the sides and the top. Stenciling is really time consuming but well worth the effort. I learned from experience that you need to use a repositionable spray adhesive to avoid bleeding (sounds painful, right?).
I still didn't know how I was going to use the paint to transform this dresser. I wanted to stencil but I had a hard time choosing the pattern. I went with the Martha Stewart Arabesque Craft Stencil for the top and sides.
Stenciling really took a long time. I used a foam roller to apply a very pale lavender paint. I had to stop my project at 3:00 because my husband made plans with a friend to do a cook out (before I entered the contest).
Right about this point I decided to paint the sides and the face the same color as the stencil.
I started working on it again at about 7:00 pm. I only had four hours left to submit the project. Yikes!!! I added the knobs but felt that the front was to plain all white. I felt like Pooh Bear, think, think, think. What could I do to accent the drawers but not take away from the stencil? Then it hit me, stripes! The tape was just the right width for perfect stripes. I covered the whole front and then removed every other piece. Painting the exposed area lavender.
I removed all the tape and put the knobs on the drawers. Then I added shelf lining to the inside of the drawers. It was 10:00! I finished on time. Before I could submit my project I had to take pictures, create a collage, and do a write up. With only 10 minutes to spare I completed the challenge.
Below is my submission.

When I found out paint was the challenge I had a flash flood of ideas. Paint sounds so easy but the options are endless and it made this a real challenge. I finally pulled my thoughts together and I thought of this dresser I bought at a yard sale this spring. This dresser has been painted so many times before. It even had that funky smell, yeah you know the smell. I just couldn't put another coat of paint over it. I had to strip off all the old paint and do this right. I painted the dresser, high gloss, white and stenciled the top and sides with a very faint, egg shell, lavender. I painted the front of the drawers with a stripe pattern. I used a slightly darker lavender to highlight the side of the drawers. The dresser features two patterns, two sheens, and three colors, making it a playful yet subtle work of art. Finally, for that finishing touch, I added white porcelain knobs.
Here are a few more pictures of the finished dresser.

Thanks for reading and thanks for your support in the contest! I can't wait to show you what I have in store for next week.


Such a nice job on this, Callie! I love it!
ReplyDeleteThank you Rebecca!
DeleteThis looks lovely and love the soft colors!
ReplyDeleteThank you, me too!
DeleteWhat a gorgeous transformation! I love the color and stencil and stripes, I love it all! If you get a chance, please share this on my linky party: http://suburbsmama.blogspot.com/2013/05/sunday-linky-party-9.html
ReplyDeleteThanks, I love mixing patterns. I just linked up!
DeleteHopping over from Frugal Fit Family.
ReplyDeleteThis looks great!
I would love for you to share and link up at my TGIF Link Party. The party is open every Thursday night and closes Wednesday’s at midnight.
http://apeekintomyparadise.blogspot.com/
Have a wonderful week!
Hugs, Cathy
Thanks, I just linked up!
DeleteI guess you work well under pressure. Me, too. :) Hope you are having a great holiday weekend. Your friend, Linda
ReplyDeleteI've always been that way. I use up every last minute. Thanks for visiting.
DeleteSo pretty. I'm glad you were under the gun and came up with the striped pattern. I love the mix of the two patterns, and you've given me ideas for an old dresser that is just sitting in my basement.
ReplyDeleteThanks Jill, I would like to see it when your done.
DeleteCallie! That is so cute-we love the colors and the patterns used.
ReplyDeleteJust wanted to drop you a note that we appreciate you taking the time to link your post to our BeBetsy BRAG ABOUT IT Tuesday Link and Hop!
Hope to see you again next week with more great projects BeBetsy Link and Hop
the best to you,
Sharon and Denise
Thanks for stopping by!
DeleteThis looks great! I have never stenciled anything and it is good to know that I will need the adhesive spray! Thanks for sharing at the Friday Follow Along. Please come share again this week at www.leahinspired.com
ReplyDeleteThank you, Leah. This was my second stencil project I really learned a lot from my first project.
DeleteI love love love it:)!! Gorgeous. Thanks so much for linking up @ The Owl's Skull! Hope to see you back again next week (I just may be featuring that dresser;)). Jess
ReplyDeleteThanks I'm glad you like it!
DeleteThe dresser looks amazing with all the different patterns and the color is great !
ReplyDeleteThanks I'm trying to be brave and mix patterns more.
DeleteLove the look of the dresser. Great job.
ReplyDeleteHave a happy day.
Thanks for visiting.
DeleteYour dresser is lovely. I'm so intimidated by painting furniture, but I'd love to make one just like this. I'm going to have to get over my fear. I'd love to have you come and share at my first ever link party http://organized31.blogspot.com/2013/05/inspire-us-thursday-link-party-1.html
ReplyDeleteThanks, start small and build up to a dresser. It's also not as scary If you get the piece for free. I linked up, good luck.
DeleteVery cute, I bet your daughter loves it! Found your post at Easy Living Link Love Thursday. I have a few dressers I need to figure out what I'm going to do with and your project is inspiring! Jill @ Mama Ging
ReplyDeleteI'm glad I could be some inspiration, the inspiration usually hits me half way through the project.
DeleteWOW! What a beautiful job you did on that nice dresser! I really love the light lavender color you painted and love the detail that you lovingly painted. I personally, have always been a purple gal and when I was growing up, my dad painted my bedroom walls that same lavender color. Gorgeous then and gorgeous now! Congrats on your fantastic challenge submission!
ReplyDeletePat F.
Las Vegas
Thank you. I love purple too.
DeleteWow...nice job! You deserve to be in the Top 15! Best Wishes with the rest of the challenges! Thanks for sharing at the Shady Porch Rock 'N Share! Hope to see you again soon! Blessings, D@TheShadyPorch
ReplyDeleteThank you. I'll be there.
DeleteAWESOME!
ReplyDeleteTERRIFIC!
STUPENDOUS!
You were FEATURED on the BRAG ABOUT IT Link and Hop. Congratulations.
See the post http://bit.ly/10MK99D. Get an I Was Featured button http://bit.ly/11S2wN1.
The BRAG ABOUT IT Tuesday party starts at midnight tonight and runs through next Saturday and we hope to see you there. Tell your friends.
The best to you,
Sharon and Denise
Thank you ladies! I'm glad you liked it! I linked up again today.
DeleteFeaturing your post at the Owl's Skull today:)!! Swing by and grab a featured at button and link up some new awesomeness. Have a great week!! J http://theowlskull.blogspot.com/2013/06/the-wonderland-hop-12.html
ReplyDeleteThanks! I will.
Delete