Showing posts with label Guest Bloggers. Show all posts

12 June 2013

Guest Blogger : Parrish from Life With The Crust Cut Off


I'm happy have Parrish here today to share with us a tasty recipe.  When your done here hop on over to her blog and check it out.  Be sure to follow her too.


Life With The Crust Cut Off
 
Hi!! I'm Parrish, I am married to the milkman and I'm mommy to one ridiculously rambunctious toddler, Dean.  I like creating and sharing recipes and I love sharing "war" stories about parenting.  I strive to create a site free of the "mommy judgement" where all moms can go and feel comfortable about how they decide to raise their kids. Thanks so much to Callie for letting me share my Smores Bars with you!!

I must confess I hate smores, the flavor combo is delicious but let’s face it the construction of smores is just setting up you for a sticky disaster. Your first bite squishes the molten marshmallow and chocolate out the sides, all over your hands, the floor and what not. I get it….smores are fun, messy, outside food but what is the point when after the first bite all you are left with is 2 empty graham crackers and sticky shoes?

This recipe has been all over the internet (and by all over the internet yes I mean Pinterest) and I decided to give it a shot for this National Smores day and boy was it delicious.
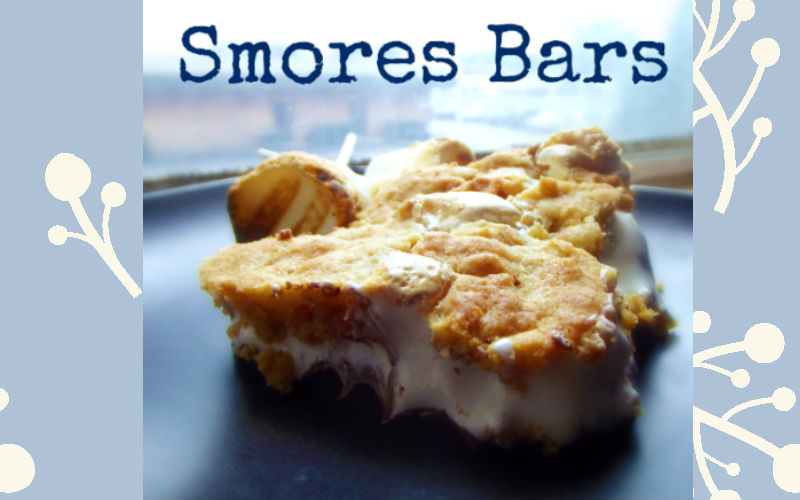


This was super simple to make and a million times easier to eat than traditional smores, everyone loved them, and while I messed up and did not read the directions properly and let it cool, we ate it piping hot from the oven and it was melty and fabulous and even after I let it cool like I was supposed to it was still amazingly delicious!

Word of advice this recipe calls for Giant Hershey bars from the candy aisle, not king sized from the checkout. You can use either but the Giant ones fit perfectly. I will be making this recipe again and again and my mind is already spinning with ideas on swapping out the Hershey bars for peanut butter cups or peppermint patties YUM!!!

So grab your kids and some graham crackers and have a Happy Smores Day!!!!!!

Smores Bars (from Lovin in the Oven)

Ingredients:
  • 1/2 cup butter, room temperature
  • 1/4 cup brown sugar
  • 1/2 cup sugar
  • 1 large egg
  • 1 tsp vanilla extract
  • 1 1/3 cups all purpose flour
  • 3/4 cup graham cracker crumbs
  • 1 tsp baking powder
  • 1/4 tsp salt
  • 2 king-sized milk chocolate bars (e.g. Hershey’s)
  • 1 1/2 cups marshmallow creme/fluff (not melted marshmallows)
Directions:

Preheat oven to 350°F. Grease an 8-inch square baking pan.

In a large bowl, cream together butter and sugar until light. Beat in egg and vanilla. In a small bowl, whisk together flour, graham cracker crumbs, baking powder and salt. Add to butter mixture and mix at a low speed until combined.

Divide dough in half and press half of dough into an even layer on the bottom of the prepared pan. Place chocolate bars over dough. 2 giant-sized Hershey’s bars should fit perfectly side by side, but break the chocolate (if necessary) to get it to fit in a single layer no more than 1/4 inch thick. Spread chocolate with marshmallow creme or fluff. Place remaining dough in a single layer on top of the fluff (most easily achieved by flattening the dough into small shingles and laying them together).

Bake for 30 to 35 minutes, until lightly browned. Cool completely before cutting into bars.

07 June 2013

Guest Blogger: Dana from This Silly Girl's Life

Today, I'm excited to introduce you to Dana from This Silly Girl's Life. She is a former professional Chef turned blogger, a newly wed, a homemaker, a daughter, lover of a good book, Mama to 4 beautiful fur babies and a cookin’ fool!

Hi everyone, I'm so excited to be guest posting with Callie today! I hope you like this recipe I brought you! I made these healthy fish tacos with cumin spiced yogurt sauce and they were a great alternative to taco night! A nice light dinner or lunch on a hot summer day, perfection!

fish tacos

09 May 2013

Guest Blogger! Rebecca of Living Better Together

I would like to introduce you to my new bloggy friend, Rebecca from Living Better Together.  She has a great no sew project to share today.  I love this technique and I see myself using it in the near future.  

My name is Rebecca and I am so honored to be guest posting for Callie today! I blog over at Living Better Together and my focus is on family, life, and the things that come along with them. I'm a Maine girl that loves pancakes and pure maple syrup, cuddling with my husband and puppy dog, and I watch way to much television! I hope that you will enjoy this project as much as you enjoy all of Callie's, she's quite the talented lady, don't you think? Thanks for having me, Callie, I can't wait to see what you bring over to my blog next week!


I have been struggling to find a pillow that was just the right shade of pink for my spare room makeover, so I decided to make one myself. I had a couple of plain throw pillows in the closet that I had grabbed for a steal at Target almost two years ago. Yeah, I know that was a while ago, and at the time my husband told me "Just because it's cheap doesn't mean you have to buy it". Well, it was something like $2.00 for the pair, so I ignored him and bought them anyway. Hey, and look two years later, I'm glad I did. 

My husband doesn't believe in pillows because he hates digging his way onto the bed or the couch ;)

I decided to pick up some fabric and attempt another no-sew pillow, you can find my first one here. One of these days I will relearn how to sew, I think a sewing machine will actually be on my Christmas list this year. Until then, I have decided that I will master the art of no-sew projects because I know I'm not the only crafty person out there that doesn't have or know how to use a sewing machine. This no-sew pillow was much more time consuming than the other one, but I think it has more character and a flirty feel to add to my spare room.

I decided to attempt to make a rosette pillow. Rosettes have been everywhere, being used  anywhere from Callie's Rosette Headband Tutorial to my Linen and Lace Wreath. I figured it would be that difficult to take that idea and put it on a pillow, I did go through a ton of hot glue though.

You will need the following items to make this:

1 Pillow
1 yard of fabric (You may need more or less depending on the size of the pillow you choose)
Hot glue gun
30 hot glue sticks
Scissors

I cut strips of the fabric that were about an inch or so wide, they don't have to be perfect because once you start twisting a gluing you won't notice. I glued down one end of the strip to secure it and then began twisting the fabric and gluing it down to the pillow while working in a circle. I started down in the low corner of the pillow, but you could start in the center if you wanted. You can see to the right side of the picture how I am twisting the fabric, try to make the colorful side of the fabric the one that will show.


Here is a photo of how the first strip turned out. You could easily just make a rosette this size on a different pillow cover as an accent, but I did an all over rosette. I glued the end of the next strip down where the last one left off and continued on my winding and gluing way. When you get to the edges you will have to twist the fabric around and head back in the other direction, basically going from side to side. 


Here is the finished product! If you have any questions, please don't hesitate to ask! Thanks for stopping by Callie's today and I hope you'll venture over to Living Better Together soon!


30 April 2013

Guest Blogger! Camila from TitiCrafty

Camila from TitiCrafty is visiting today and has a super creative craft to share with you.  She is a talented crafter and a new bloggy friend of mine.  I hope you enjoy her craft!  I'm so excited to do this one with the kids I even pinned this to my "Summer Crafting with the Kids Board."  Be sure to visit her blog for more crafty inspiration.


Móvil de bolas de lana. Un toque especial para mi estación de trabajo!


Sometimes we feel like there is something missing, monotony often makes us need change. That was happening to me, my workstation needed some life and love because I don't have much decoration in it.

A veces uno siente que en su entorno falta algo, la monotonía a veces hace que queramos cambios. Eso me pasaba a mi, me hacía falta algún toque a mi estación de trabajo, pues no tengo mayor decoración en ella y ya me esta haciendo falta. 


In many blogs (I couldn't say anymore which ones) I saw beautiful decorations of balls made with wool. It looked so NICE! But by that time I didn't thought about making them so I didn't bookmarked or anything. Then looking for ideas to decorate my workstation, I remembered those wool balls.

En varios blogs, ya no sabría decir en donde pues ha pasado tiempo, vi decoraciones hermosas con bolas hechas con lana. Me parecieron SÚPER! Pero en el momento no les di importancia más allá de lo original que era. Luego buscando una idea para decorar mi estación de trabajo, me acordé de esas bolas de lana.


This is my version of the wool balls mobile =D:

Esta es mi versión del móvil de bolas de lana =D:

23 April 2013

Guest Blogger! Megin of VMG206

I want to introduce my friend Megin of VMG206.  She is guest blogging today and sharing her creative idea for a Mother's Day gift, with printables!  I love her blog and I know you will too. 

Megin of VMG206


"I love (dark) coffee, (dark) chocolate and neutral colors.  I’m a very visual person and I love layers and texture.  I so enjoy all things crafty; but I don’t consider myself all that crafty."
 ~ Megin of VMG206