I had a reader recently comment that "Sometimes people show room makeovers and before and after pics and make it seem like it was a quick/no big deal kind of thing." I find that to be so true. This post will not just be a quick before and after! You are going to see every step and every mess-up in-between. If at first you don't succeed, try, try, again.
Showing posts with label Crafts. Show all posts
17 June 2013
Stenciled Lazy Susan
I had a reader recently comment that "Sometimes people show room makeovers and before and after pics and make it seem like it was a quick/no big deal kind of thing." I find that to be so true. This post will not just be a quick before and after! You are going to see every step and every mess-up in-between. If at first you don't succeed, try, try, again.
05 June 2013
4th of July Glitter Jeans and T-Shirt
I'm sad to announce that I didn't make it into the top 5 at one crafty contest.
To see who did click here.
It was so much fun being a part of One Crafty Contest. It challenged me to complete my paint project on time and work with products I have never used before like washi tape. The challenge for round 5 was glitter I created this 4th of July outfit for my daughter. I think I may make coordinating outfits for my other kids.
03 June 2013
Mod Podge & Paper Butterflies Lamp Shade
I can mark another project off the list for my daughter's room. Only 3 more until it's complete, maybe. I found this great little lamp for my daughter's room at Dollar General! I saw a blank slate and knew I could find something crafty to do to it. A stencil? Some ruffles? How about flowers?
How about Mod Podge?
16 May 2013
Dry Erase Marker Teacher Appreciation Gift
School is almost out for summer, less than one week! I wanted to give our teachers a little something to say thank you ( for putting up with my kids). Not long ago I pinned on my To Do Board this dry erase marker craft. I wish I could take full credit for this idea but I found my inspiration at The Happy Scraps. I'm sharing this craft over at Living Better Together. Be sure to stop by and visit her blog too!
Cut your foam to fit your container (I use a butter knife). Push the markers into the foam.
Place the foam and markers into the container and cover with grass. You may want to use hot glue to secure the foam. I did not just in case the teachers want to reuse the container.
Using my Cricut, I cut my flowers 2 1/2" and used a hole punch on the center of each flower.
Then place the flower on the top of each marker.
I hope you enjoyed this craft. Have a great summer!
Items Needed:
planting container
easter grass
dry erase markers
floral foam
scrapbook paper
hole punch
Cricket
Cut your foam to fit your container (I use a butter knife). Push the markers into the foam.
Place the foam and markers into the container and cover with grass. You may want to use hot glue to secure the foam. I did not just in case the teachers want to reuse the container.
Using my Cricut, I cut my flowers 2 1/2" and used a hole punch on the center of each flower.
Then place the flower on the top of each marker.
I hope you enjoyed this craft. Have a great summer!
Sharing At:
Labels:
Crafts,
Tutourials
15 May 2013
Framed Art Display
Quick announcement! Callie's Crafts made it into the top 20 at One Artsy Momma's, One Crafty Contest. Each week a new challenge will be presented. Head over to One Artsy Momma and follow along with the contest. Be sure to vote each week for your favorite! Now, I'm off to brainstorm and do some painting!
I've completed another project in my daughter's room. I made a place for Paige to display her art work. By using things I already had I was able to do this project for about $3. I purchased the butterfly clips and the ribbon. I collected 3 large picture frames. I found one on the curb and got 2 from my mom. I used fabric (old curtains) and covered cardboard to create the backing. Keep reading to see the tutorial.
Labels:
Crafts,
DIY,
For the Home,
Great Finds,
Paint,
Tutourials
30 April 2013
Guest Blogger! Camila from TitiCrafty
Camila from TitiCrafty is visiting today and has a super creative craft to share with you. She is a talented crafter and a new bloggy friend of mine. I hope you enjoy her craft! I'm so excited to do this one with the kids I even pinned this to my "Summer Crafting with the Kids Board." Be sure to visit her blog for more crafty inspiration.
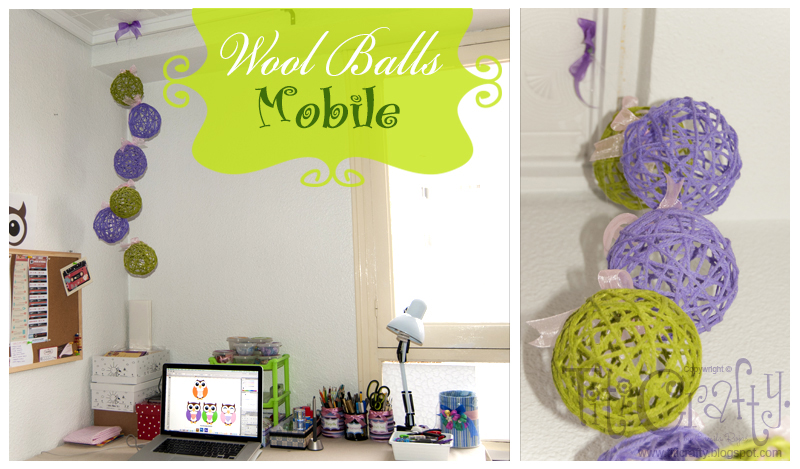
Sometimes we feel like there is something missing, monotony often makes us need change. That was happening to me, my workstation needed some life and love because I don't have much decoration in it.
A veces uno siente que en su entorno falta algo, la monotonÃa a veces hace que queramos cambios. Eso me pasaba a mi, me hacÃa falta algún toque a mi estación de trabajo, pues no tengo mayor decoración en ella y ya me esta haciendo falta.
In many blogs (I couldn't say anymore which ones) I saw beautiful decorations of balls made with wool. It looked so NICE! But by that time I didn't thought about making them so I didn't bookmarked or anything. Then looking for ideas to decorate my workstation, I remembered those wool balls.
En varios blogs, ya no sabrÃa decir en donde pues ha pasado tiempo, vi decoraciones hermosas con bolas hechas con lana. Me parecieron SÚPER! Pero en el momento no les di importancia más allá de lo original que era. Luego buscando una idea para decorar mi estación de trabajo, me acordé de esas bolas de lana.
This is my version of the wool balls mobile =D:
Esta es mi versión del móvil de bolas de lana =D:
Móvil de bolas de lana. Un toque especial para mi estación de trabajo!
Sometimes we feel like there is something missing, monotony often makes us need change. That was happening to me, my workstation needed some life and love because I don't have much decoration in it.
A veces uno siente que en su entorno falta algo, la monotonÃa a veces hace que queramos cambios. Eso me pasaba a mi, me hacÃa falta algún toque a mi estación de trabajo, pues no tengo mayor decoración en ella y ya me esta haciendo falta.
In many blogs (I couldn't say anymore which ones) I saw beautiful decorations of balls made with wool. It looked so NICE! But by that time I didn't thought about making them so I didn't bookmarked or anything. Then looking for ideas to decorate my workstation, I remembered those wool balls.
En varios blogs, ya no sabrÃa decir en donde pues ha pasado tiempo, vi decoraciones hermosas con bolas hechas con lana. Me parecieron SÚPER! Pero en el momento no les di importancia más allá de lo original que era. Luego buscando una idea para decorar mi estación de trabajo, me acordé de esas bolas de lana.
This is my version of the wool balls mobile =D:
Esta es mi versión del móvil de bolas de lana =D:
Labels:
Crafts,
DIY,
For the Home,
Guest Bloggers
25 April 2013
Easy Grapevine Ball Topiary
I know you can't wait to see the reveal for my daughter's room. I have 4 more projects before her room is complete. This craft is quick and easy to do. What to see how I did it? Keep reading to see the tutorial.
Labels:
Crafts,
DIY,
For the Home,
Paint,
Tutourials
23 April 2013
Guest Blogger! Megin of VMG206
I want to introduce my friend Megin of VMG206. She is guest blogging today and sharing her creative idea for a Mother's Day gift, with printables! I love her blog and I know you will too.
"I
love (dark) coffee, (dark) chocolate and neutral colors. I’m a very visual person and I love layers
and texture. I so enjoy all things
crafty; but I don’t consider myself all that crafty."
16 April 2013
Birdcage Floral Arrangements
So far, I've painted my daughter's walls, painted a chalkboard on her door, made over her chair, built a crown moulding shelf, a hanging butterfly ball, painted a chalkboard on her door and recovered her chair. Now, I have decorated a few birdhouses for her plant ledge and I'm not done yet. Be sure to follow Callie's Crafts so you don't miss the reveal.
08 April 2013
Hanging Butterfly Ball
I am re-decorating my daughter's room. So far I have painted her walls lavender and built a crown moulding shelf. The next idea I want to share is the butterfly ball I made to hang from her vaulted ceiling. It is the perfect spring craft. You could also use this technique to make a topiary or a wreath.
06 March 2013
Bathroom Art
My latest decorating project is the kids bathroom. So far I have painted the walls and built floating shelves. The full reveal is coming soon. Now it is time for the finishing touches. Once again I wanted to decorate with out spending a lot of money. (That seems to be a theme around here.) I recycled our old 10"x10" canvas art to create new art (reminders) for the kids bathroom. I already had everything for this project in my craft supplies.
14 February 2013
09 February 2013
25 January 2013
Be Mine!
Valentine Holder Craft
I haven't posted in a few days because my whole family is sick with the flu. I haven't had time to make a post or work on any projects. I managed to find time to try a few crafts yesterday. One was a fail and one turned out great.
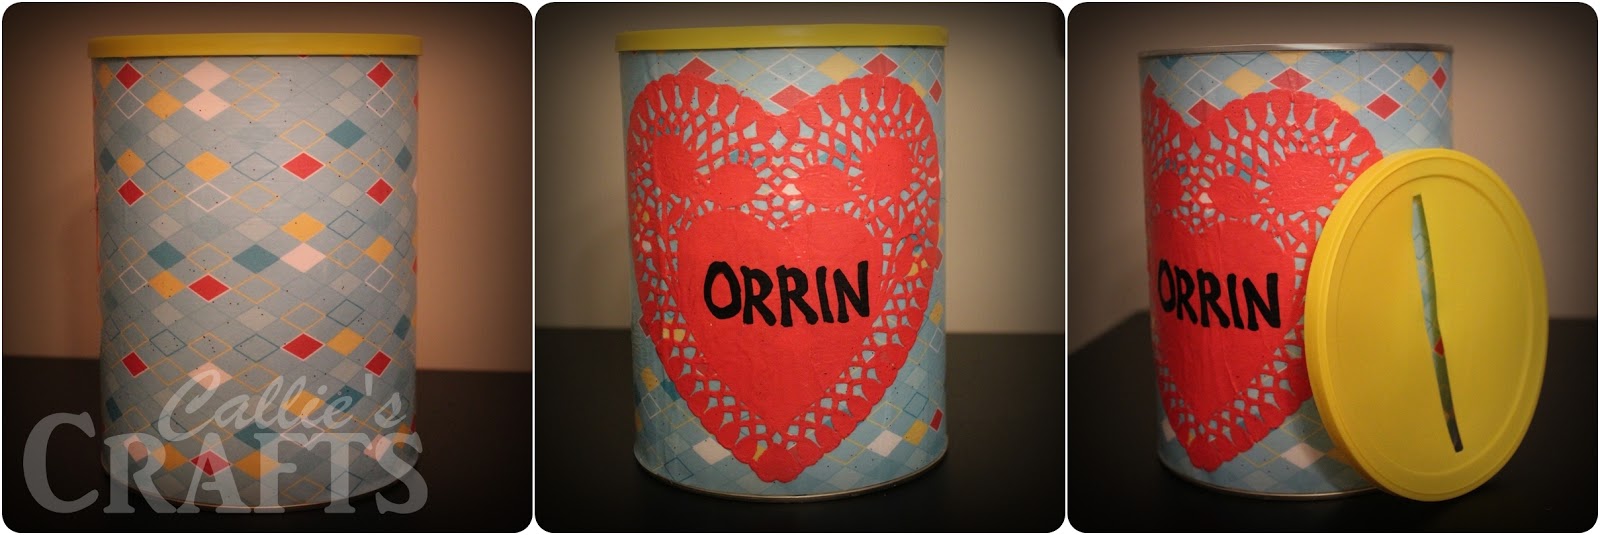
My son needs a Valentine Holder for his class party. I didn't want to spend any money (I can't really go to the store right now) so I used things I already had.
| Paper Doile, 2 Sheets of Paper, Mod Podge, Empty Formula Can |
I brushed Mod Podge on the outside of the paper and applied the paper doilie. For the final step I brushed Mod Podge onto the outside of the doile. Adding Mod Podge to the outside of the paper creates a protective layer.
When It was dry I added his name and cut a hole in the lid.
Labels:
Crafts,
DIY,
Holidays,
Organization,
Tutourials
20 January 2013
Sandprint Shadow Box
This is a fun project to do the next time you're at the beach!
Items Needed:
Aluminum Cake PanSand
Sea Shells
Plaster of Paris
To make your own, one-of-a-kind "sandprint," place dampened sand in an aluminum cake pan, pressing down firmly. The sand should be deep enough to make your handprint. After making handprint, place various sea shells upside down, pushing firmly into the sand. The kids have a lot of fun using the beautiful shells they have found! Mix enough Plaster of Paris with water to make a mixture the consistency of thick cake batter (follow directions on box). Carefully pour into hand print and continue filling cake pan with about 1" of plaster. You need to work rather
quickly as the plaster can set up pretty fast. Let the plaster dry thoroughly before turning over to release.
My children's sandprints were mounted in a shadow box for a memorable display that I
proudly display in my hallway. To view my hallway makeover, click here.
Sharing At:
Labels:
Crafts,
DIY,
For the Home,
Tutourials
17 January 2013
Dollar Tree Valentine's Crafts
When I read that Debbiedoo's and Fox Hollow Cottage are hosting a Valentine's Party where all the crafts are made with items from the Dollar Tree I knew that I was up for the challenge. When I walked in the Dollar Tree my mind drew a blank and my creativity was gone.
(It didn't help that I took my 4 kids with me. Mom. Mom. Mom. MOM!)
After browsing the whole store I went back to the candles and found these.
I melted the candles on the stove. I took the wicks out of the candles to use later. I used a few more red candles, I already had, to get enough wax.
For the heart shaped candle I poured the white first and added a little red to make pink. When It was dry I added the red to make a layered candle.
To make the tall candle I tied a string to the wick and wrapped it around a pencil to hold it upright.
I then poured in the remaining red wax.
For the next craft I glued a candle dish and a candle stick together.
They turned out beautiful and all for $6!
Sharing at:

Labels:
Crafts,
DIY,
Holidays,
Tutourials
16 January 2013
Hostess Aprons New to Etsy
I was working on this post when the batteries in my keyboard stopped working. I would like to write more but I am typing with a mouse and on screen keyboard.
These are aprons I have made to sell locally. They are now available at my Etsy Shop too.
| Hostess Apron : Lime Green and Teal Flower Stripe |
| Hostess Apron : Teal and Pink Flowers and Lime Green |
| Hostess Apron : Hot Pink with Zebra Pattern and Black and White Polka Dot |
| Hostess Apron : Pink and Brown with butterfly print skirt |
| Hostess Apron : Black and Purple |
Subscribe to:
Posts (Atom)