I had a reader recently comment that "Sometimes people show room makeovers and before and after pics and make it seem like it was a quick/no big deal kind of thing." I find that to be so true. This post will not just be a quick before and after! You are going to see every step and every mess-up in-between. If at first you don't succeed, try, try, again.

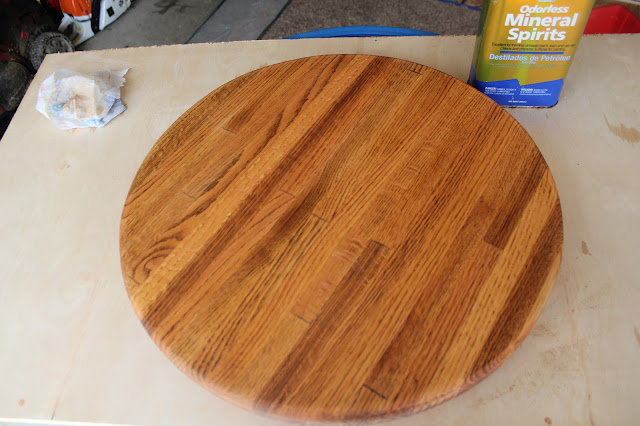
My mother had a yard sale and she offered me her old lazy

I used my palm sander to remove the old finish.

I like to clean the wood with mineral spirits after sanding.

I used a Martha Stewart Craft Stencil and white acrylic paint to make the pattern.

Then I repositioned the stencil to continue the pattern.
It looked great! Clean lines and no paint bleeding under the stencil.
Then I applied the stain and wiped it off with a rag (even over the paint). I have used this technique before on my Vintage and Modern Table and got a great result.
This time it just looked.....not right.
So, I painted over the white with teal.
I loved the colors together but I could see the white under the teal. This is the same color I painted my accent wall in the Family Room, Valspar Spa Pool.
I thought..hmm..what if i sand over the paint and make it look rustic?
Still .....not right. I'll try it again!
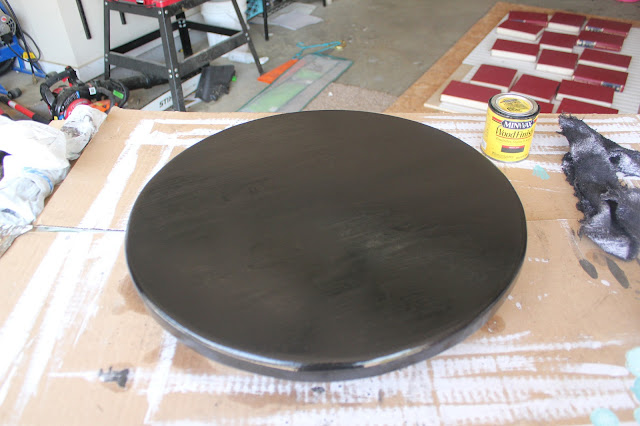
I sanded off the paint and stained the lazy susan, again. This time I used a wood conditioner before applying the stain. It really helped the stain apply more evenly.
Perfect!
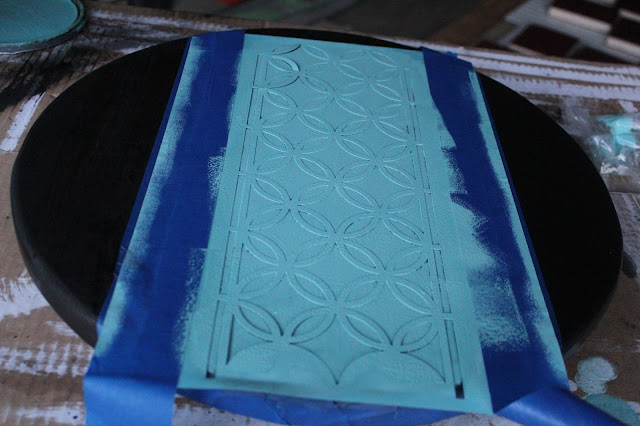
After it was dry I taped the edges and positioned the stencil. This time in the center.

I applied the paint, again.

It didn't have the crisp lines I wanted.

I lined up the stencil to continue the pattern, again.

I removed all the tape but this time there was a residue and the stencil was not centered. It still didn't have the clean lines it should have. Let's do it again!
I didn't take pictures this round because I was so frustrated. I stripped it down to bare wood, cleaned it off, applied wood conditioner and stained it, again.
This time I got smart and bought something I should of used the first time, Repositionable Adhesive!
I applied a clear lacquer to the lazy susan to protect it from ...my family at the table.
This lazy susan took a lot of trial and error but I didn't give up until I achieved the look I wanted. I hope you enjoyed reading this post.
Sharing At:


Love it! Very cute and creative :) Thanks for sharing.
ReplyDeleteThanks for stopping by!
DeleteThis is so cute! I am impressed that you stuck with it. I probably would've just said attempt #2 was good enough and then I would've hated it every time I saw it. :) Thanks for sharing all the things you tried and what finally worked!
ReplyDeleteKrissy @ http://hotcommodityhome.blogspot.com
I couldn't leave it alone. I worked on it for several days! Thanks for your kind words.
DeleteTurned out beautifully, well worth that labour of love! Following you my friend. Diane
ReplyDeleteThanks for following. I think it was well worth it to. I love having it at dinner time.
DeleteCallie,
ReplyDeleteYou gave this your all and then some! My hat is off to you in a big way! I love what you did with your lazy goose:)
New Follower, my friend!
Happy Hugs
Jemma
I'm glad to have you following!
DeleteObrigado pela visita. Fico feliz que você me encontrou.
ReplyDeleteWOW!! I love this lazy Goose, ;)... I would have given up, But you kept going. You really encourage me to try something twice.Sadly, Something I have never done!! TFS
ReplyDeleteI think the problem was I didn't know what I wanted when I started. I had to figure out what I didn't want to find what I wanted. Next time I'll have a plan!
DeleteLove how it turned out! :) I have this stencil set, but I have been hesitant to use it. lol
ReplyDeleteI've used it twice! Once for this project and once on a dresser. Remember it's just paint, you can sand it off :)
DeleteI love how you kept trying until it was exactly how you wanted it. Looks so pretty!
ReplyDeleteRitchil
http://chengand3kids.blogspot.com/
Thanks. I'm following you via bloglovin and gooogle+.
DeleteLove it!! These stencils were starring at me @ Michael's the other day..but I left them alone...I guess I have to make a trip back...:-)
ReplyDeleteThanks! This is the second time I've used them. I used them on a dresser too. http://calliescrafts.blogspot.com/2013/05/stenciled-dresser-for-one-crafty-contest.html
DeleteI really like the final result a lot! I hate it when a project goes wrong so many times, but it's an awesome feeling when it FINALLY goes right! I think we've all been there (more than we might care to admit). I have some of the Martha Stewart stencils, too - love them!
ReplyDeleteThanks for sharing!
Kim @ {enjoy the view}
Thanks, Kim, I'm glad I'm not the only one.
DeleteSuch a pretty end result (though the middle phases were super cute too!) I love showing the different phases!
ReplyDelete(new follower here!)
Morgaine from Madcap Frenzy
P.S. I would also like to invite you to join my June Totally Tuesday Link Party:
http://www.madcapfrenzy.blogspot.com/2013/06/june-totally-tuesday-link-party.html
Hugs!
Thanks, Morgaine I'm following you back.
DeleteWhat a lovely idea and the way you represented the whole DIY is just amazing. What a beautiful result you got :)
ReplyDeleteDisha
http://designdecoranddisha.blogspot.in
Thanks I'm glad you linked it.
DeleteBeautiful make over! I love the final colors.
ReplyDeleteNatashalh
Thanks. I think the teal was the right choice too.
DeleteWhat a great idea! it looks adorable! Saw you at DIY Sunday Showcase!
ReplyDeleteWould love for you to link this up to Super Sunday at Who Needs a Cape? http://whoneedsacape.com/2013/06/super-sunday-party-4/ it's live now - come on over!
Thanks. I'll be there.
DeleteI'm So glad you made it over! Thanks for sharing this with us on Super Sunday!
DeleteHope we see you next week!
I LOVE it, it turned out great!! I also like that you are like me with the "try, try, try again" technique! Lol. It looks fabulous, and I am pinning! Thanks for sharing at the DIY Sunday Showcase! Jen
ReplyDeleteStopping by to thank you for sharing at One More..http://www.onemoretimeevents.com/2013/06/share-it-one-more-time-features-and_29.html This came out perfect! I know how you feel about doing it until you get it the way you want it and I agree with it is just paint...you can always paint over it :)
ReplyDeleteSo happy you joined in this week...xo Tammy
Love this!!!!
ReplyDeleteThanks so much for sharing at A Peek Into My Paradise TGIF Link Party! I can't wait to see what you link up next week! I hope to see you at the (Not SO) Wordless Wednesday Blog Hop! http://apeekintomyparadise.blogspot.com/
Have a terrific week!
Hugs, Cathy
It turned out very nice after all of that! I have a lazy susan to paint and stencil too. Will definitely do it after seeing yours. I agree, blog posts often make DIYs looks so easy, but they are not.
ReplyDeleteI love it, Callie! And OMG I had to laugh ~ I think all my DIY projects go like that, I usually just don't tell or I give up and toss it! Stencils are a nightmare. Did you use the repositionable spray adhesive to hold it in place? The finished look is amazing!
ReplyDeleteThank you for sharing at Brag About It this week!
~ Megin of VMG206
Enter the Wonderful Summer Giveaway (ends 7/3 midnight)
Hi Callie,
ReplyDeleteThanks for co-hosting the TGIF Link Party with me last week! Your Lazy Susan was the most viewed post last week! Head on over to grab a feature button and link up again! Have a great weekend!
http://www.livingbettertogether.com/2013/07/tgif-link-party-no-3.html
Rebecca
Thanks so much for sharing this at the Say G'Day Saturday linky party. I loved your pictures and the end product looks amazing!
ReplyDeleteThis week's party has just started so please drop by and say g'day soon!
Best wishes,
Natasha in Oz
Way to persevere! I love this! You are one of the features today at the Make it Pretty Monday party at The Dedicated House. Pop on in and grab a feature button for your blog. Here is the link to this week's party. http://thededicatedhouse.blogspot.com/2013/07/make-it-pretty-monday-week-57.html Hope to see your prettiness again at the bash! Toodles, Kathryn @TheDedicatedHouse
ReplyDeleteTotally worth the trip! Nothing lazy about your passion to get this right:) LOVE your refinish. I have a lazy susan I've been wanting to refinish too. Your post is going to be so helpful, lol! Swim by http://www.sewsweetvintage.com/2013/07/vintage-swimwear.html
ReplyDeleteBeautiful! What color stain did you use?
ReplyDeleteThanks I used Ebony.
Delete